Files
-
- 10 MB
- Download
Introduction
WebSockets are a technology built on top of HTTP that enables efficient, bidirectional communication between browser-based clients and servers without the overhead associated with traditional polling methods like AJAX requests. This eliminates the need for client plugins and improves reliability. The FME Flow WebSocket Server allows fast, real-time communication with client web applications that execute on WebSocket-supported browsers.
The Live Spatial Dashboard demo uses the WebSocketConnector with FME Flow Streams to provide near real-time updates of vehicle movements.
In this article, we will cover three key concepts:
- Using the WebSocketConnector transformer.
- Configuring an FME Flow Stream to run a workspace that sends data to FME Flow continuously.
- Connecting to the WebSocket stream through a browser.
We will be working through the sd_bus.fmw workspace, which covers configuring the WebSocketConnector transformer and controlling the data flow rate. The workspaces for planes and buses are included in the downloadable exercise files for reference and include comprehensive data preparation. While this article covers the necessary JavaScript to display the WebSocket stream in a browser console, the downloadable files provide examples of parsing the data into Leaflet objects for visualization on an interactive dashboard.
Whether you're looking to build a real-time map application or simply understand the mechanics of streaming WebSocket data with FME, this tutorial will equip you with the essential tools and knowledge.
How it Works
Live data feeds for ships, buses, and flight traffic are utilized. Formats and protocols used include AIS, ADS-B, HTTP, WebSockets, and JSON.
- Bus Data: Provided in JSON format from a web service. The workspace reads the web service data at a controlled rate and streams bus locations to the built-in WebSocket server on FME Flow. This dataset has already been formatted to be sent as a WebSocket message.
- Ship Data: Provided in AIS format from a streaming feed. A workspace continually reads from the feed, transforms the AIS data to JSON, and streams the features to the WebSocket server.
- Flight Data: Provided in JSON format (from ADS-B) and accessed via a web service. A workspace reads the JSON and streams out the flight status to the WebSocket server.
Due to regulations on data sources, data has been simulated.
Requirements
- A basic understanding of JavaScript and web development.
- One available FME Flow engine per data stream.
- Note: Read about Dynamic Engines.
Step-by-Step Instructions
Part 1: Using the WebSocketConnector
In this section, we will guide you through setting up a WebSocket connection to send a JSON message to the FME Flow WebSocket server. The WebSocketConnector initializes a connection to a specified WebSocket Server URL. To start, download the exercise files attached to this article.
1. Inspect the Data
In the exercises folder, open the sd_bus.fmw workspace in FME Workbench. Select the buses JSON reader feature type and click “Run Just This.” Inspect the cached features in the Visual Preview Window.
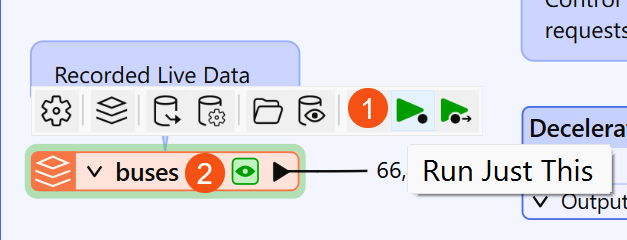
Select a row in the ws_msg column, and a preview window will appear displaying a single JSON object. If the data appears in plain text, select “JSON” in Syntax Highlighting to auto-format.
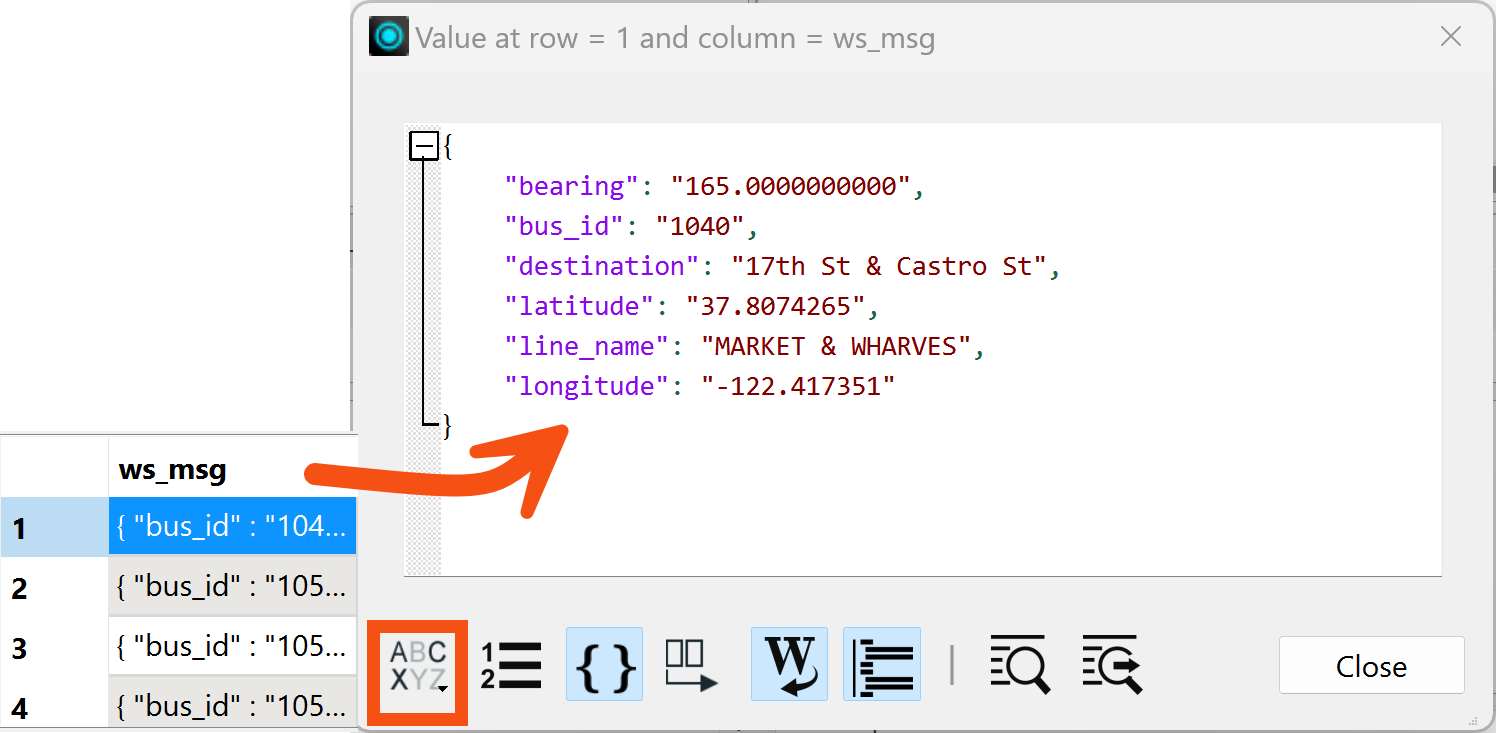
Each row contains a pre-formatted WebSocket message that we will send through the WebSocketConnector transformer to FME Flow. The message contains locational data and information about the bus’s destination. Notice each bus has a unique ID, this can be used to update the location of a particular vehicle.
To learn more about how the WebSocket messages were formatted in this workspace, refer to the sd_plane.fmw or sd_ships.fmw workspaces and inspect the JSONTemplater.
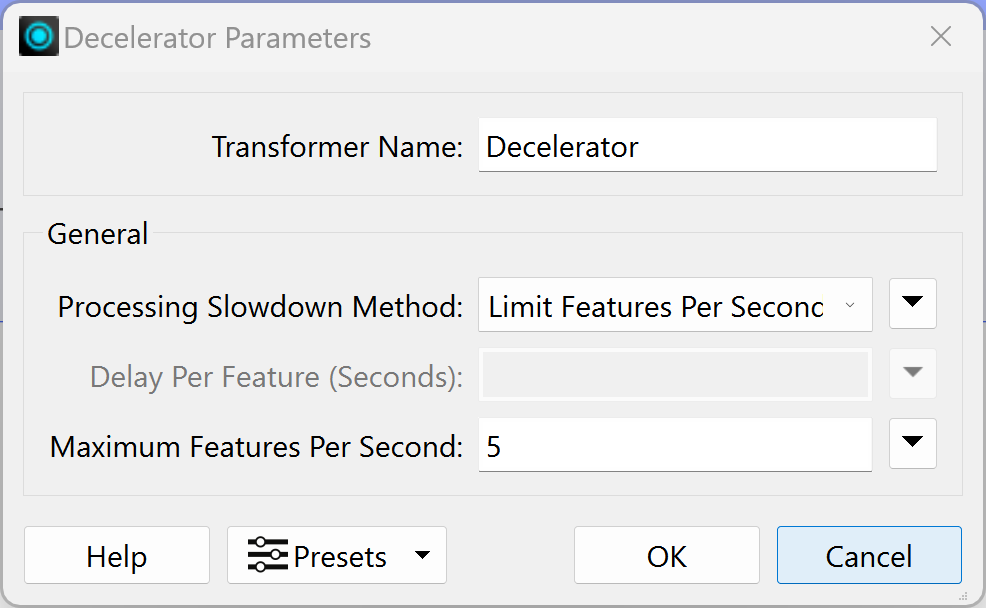
2. Set the Transmission Rate
To simulate a live data stream, we’ll use the Decelerator transformer to set the speed at which features are sent to the server. Open the Decelerator transformer, the Processing Slowdown Method has been set to “Limit Features Per Second”, and the Maximum Features Per Second is 5.
Features will be streamed line by line as they are read into the workspace. If you would like to process the data in batches, check out the Windowing Data Streams article.
3. Sending a WebSocket Message to FME Flow
If FME Flow is not configured for SSL, WebSockets will use Port 7078 and a “ws://” prefix. If FME Flow is configured for SSL, WebSockets will use Port 443 and use a “wss://” prefix.
If Port 7078 or 443 is not available because of a firewall or other process, set the WEB_SOCKET_REQUEST_PORT to your desired port number in the FME WebSocket Configuration File: <FMEFlowDir>\Server\fmeWebSocketConfig.txt This tutorial will assume FME Flow is locally hosted and not configured for SSL. For more information on FME Flow port configuration, reference the FME Flow Ports documentation.
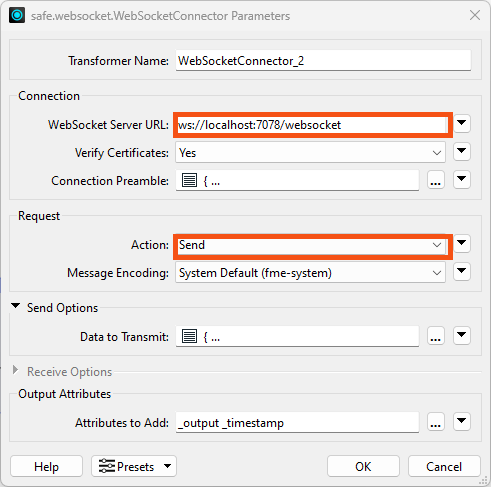
Open the WebSocketConnector. Enter the WebSocket Server URL for your FME Flow installation. This tutorial uses a local, non-secure installation of FME Flow so the WebSocket Server URL has been set to ws://localhost:7078/websocket.
Use the “send” Action to transmit data to the server.
FME leverages Native Session-Based Chat Protocol for WebSocket communication. In the WebSocketConnector, select the ellipsis button next to Connection Preamble and paste in the following:
{
    "ws_op" : "open",
    "ws_stream_id" : "sd_bus"
}
Set the Action to “send”, and leave Message Encoding to the “system default”. Under Send Options click the ellipsis button next to Data to Transmit and paste in the following:
{
    "ws_op" : "send",
    "ws_msg" : "@Value(ws_msg)"
}
The attribute "@Value(ws_msg)" will populate the WebSocket message with our JSON message. Your parameters should look like the image below.
4. Testing the Workspace
Run the workspace with feature caching enabled. If no errors appear in the Translation Log and features are passing through, the WebSocketConnector has successfully connected with FME Flow.
If the connection is refused, ensure that the WebSocket port is listening and that a firewall is not blocking the connection.
Part 2: Streaming Workspaces on FME Flow
This section uses FME Flow Streams to run the <workspace> workspace and transmit live WebSocket data. It includes an optional step that uses an FME Flow Automations WebSocket Trigger to verify the Stream data.
1. Publish the Workspace to FME Flow
In FME Workbench, open the Publishing Wizard. Create a new repository (New...) and name it “LiveSpatialDashboard”. Make sure to select the data file (“buses.json”) to upload. Click Next.
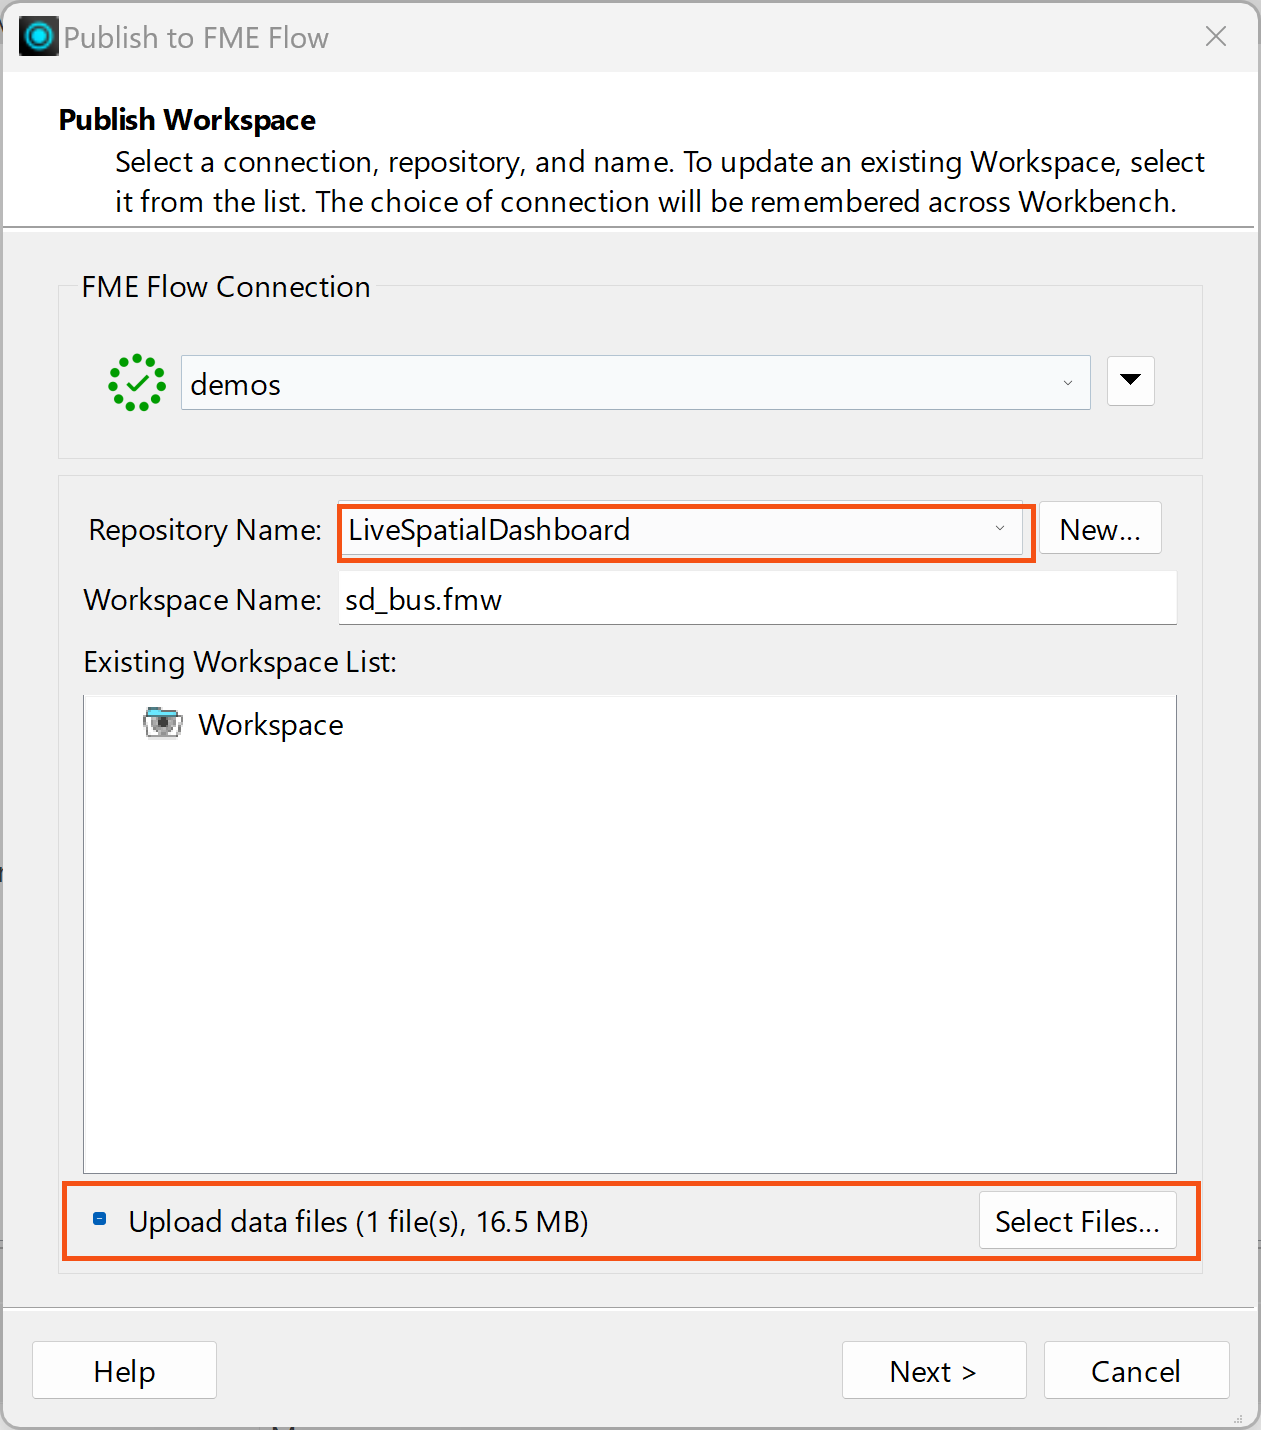
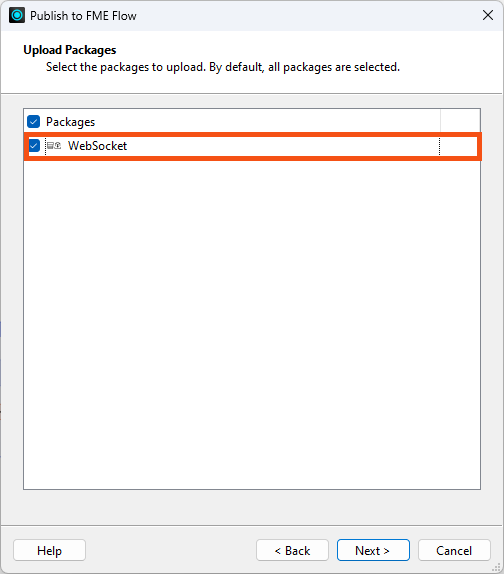
The WebSocketConnector transformer is not included in a standard FME installation, so we need to upload the package to FME Flow to enable the server to create WebSocket connections. When prompted to upload packages, ensure WebSocket is selected.
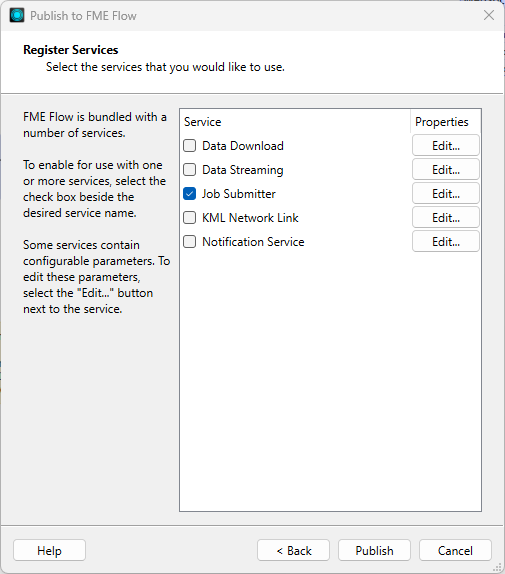
FME Flow Transformation Services allow us to control how the end user receives the translation results. Because we will be using Streams, we only need to use the Job Submitter to submit the job once.
Do not select Data Streaming. Data Streaming a workspace sends the results back to a user immediately in a web browser and is not required in this case.
2. Streaming the Workspace on FME Flow
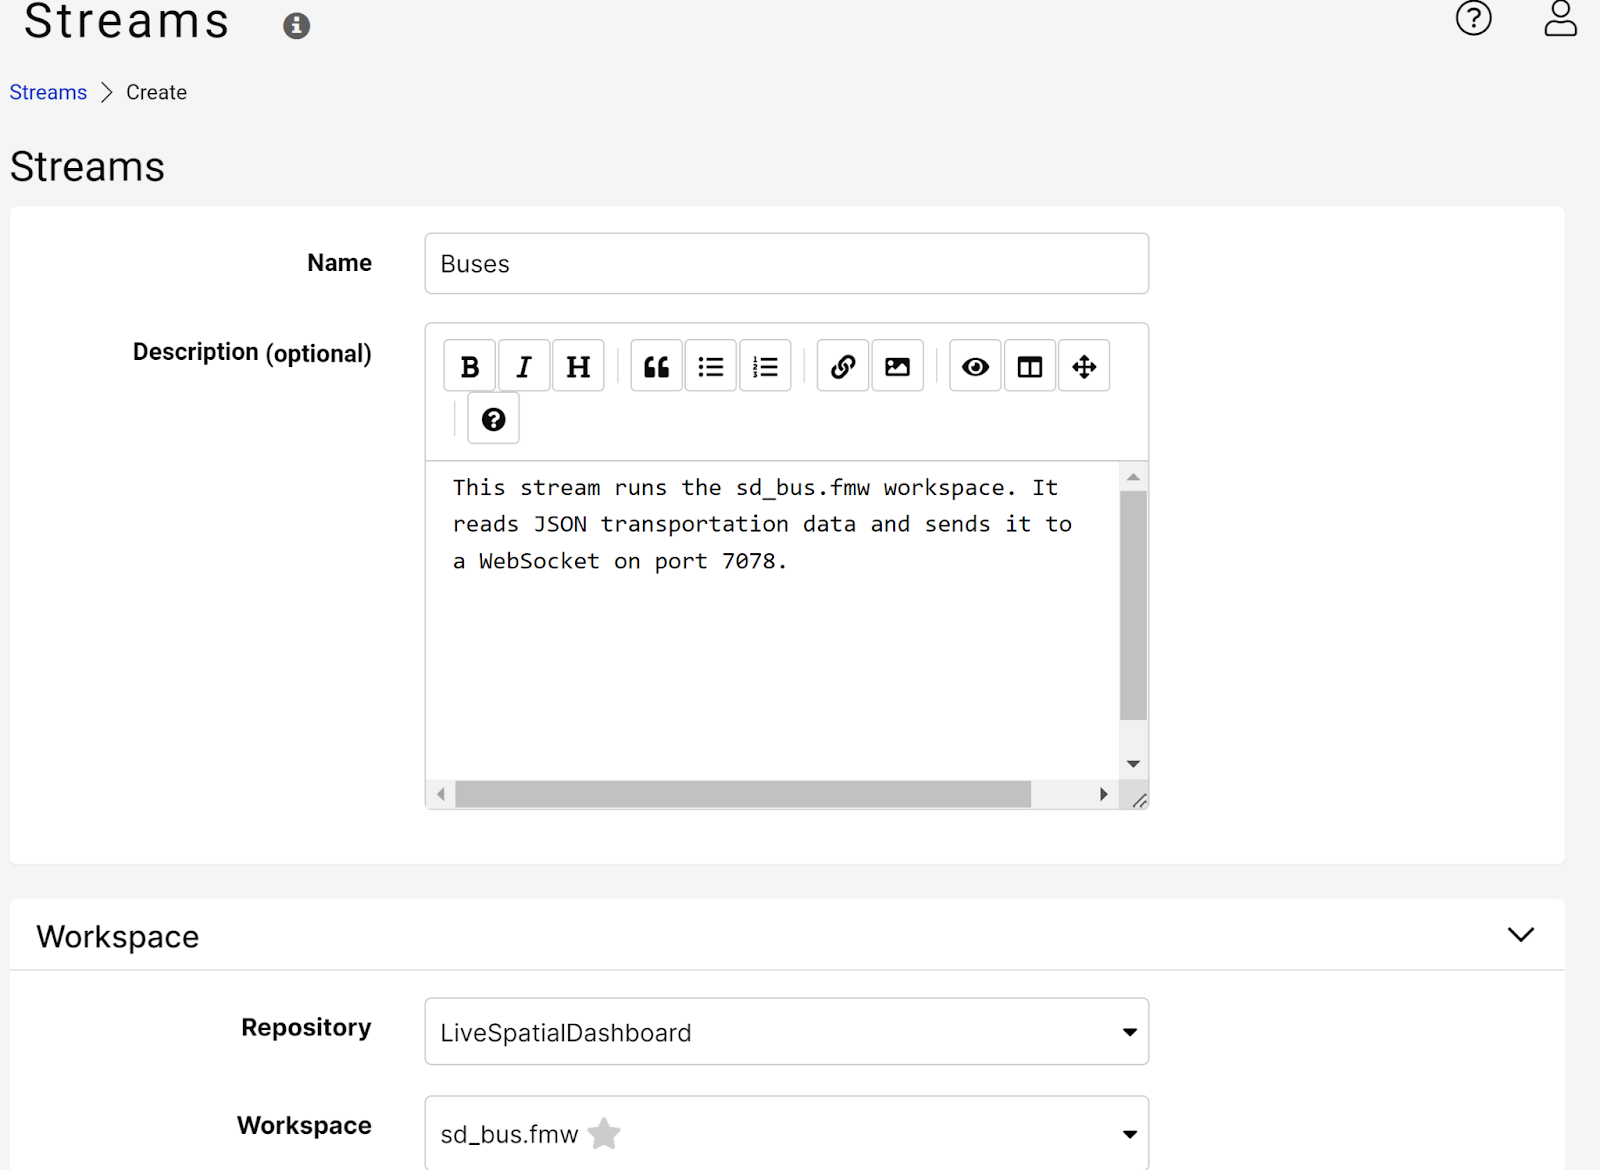
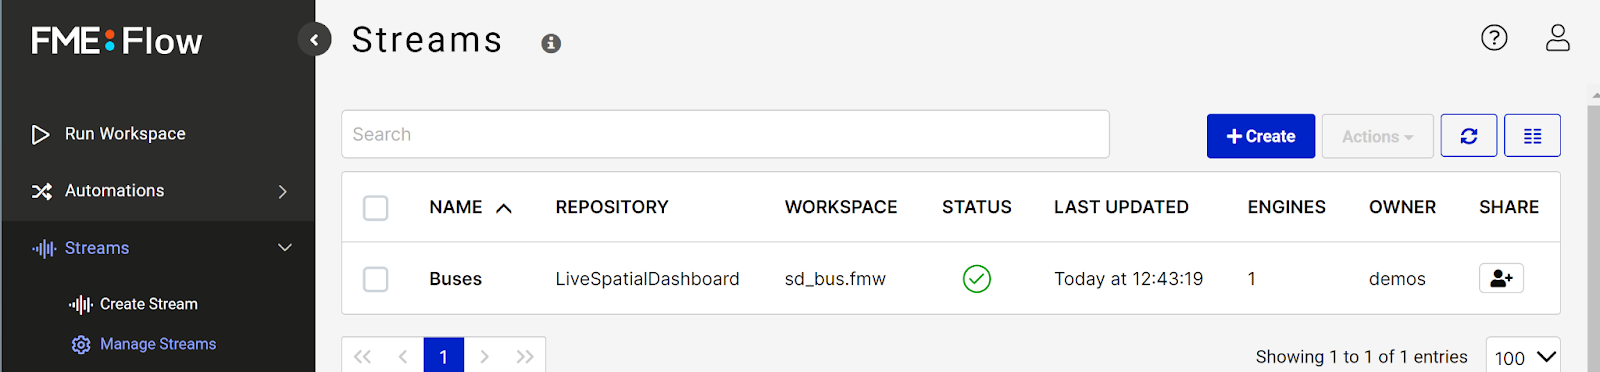
Log into FME Flow and select Streams, then click Create Stream in the sidebar. Provide a name and an informative description for your stream. Under Workspace, choose the “LiveSpatialDashboard” repository and select the sd_bus.fmw workspace.
Click OK, you will be taken to the Manage Streams tab. When you create a stream, an FME Engine must be dedicated to run that workspace continuously, that FME Engine will not be available to run any other jobs while the stream is running.
To assign an engine, click “Manage” under Assigned Engines.
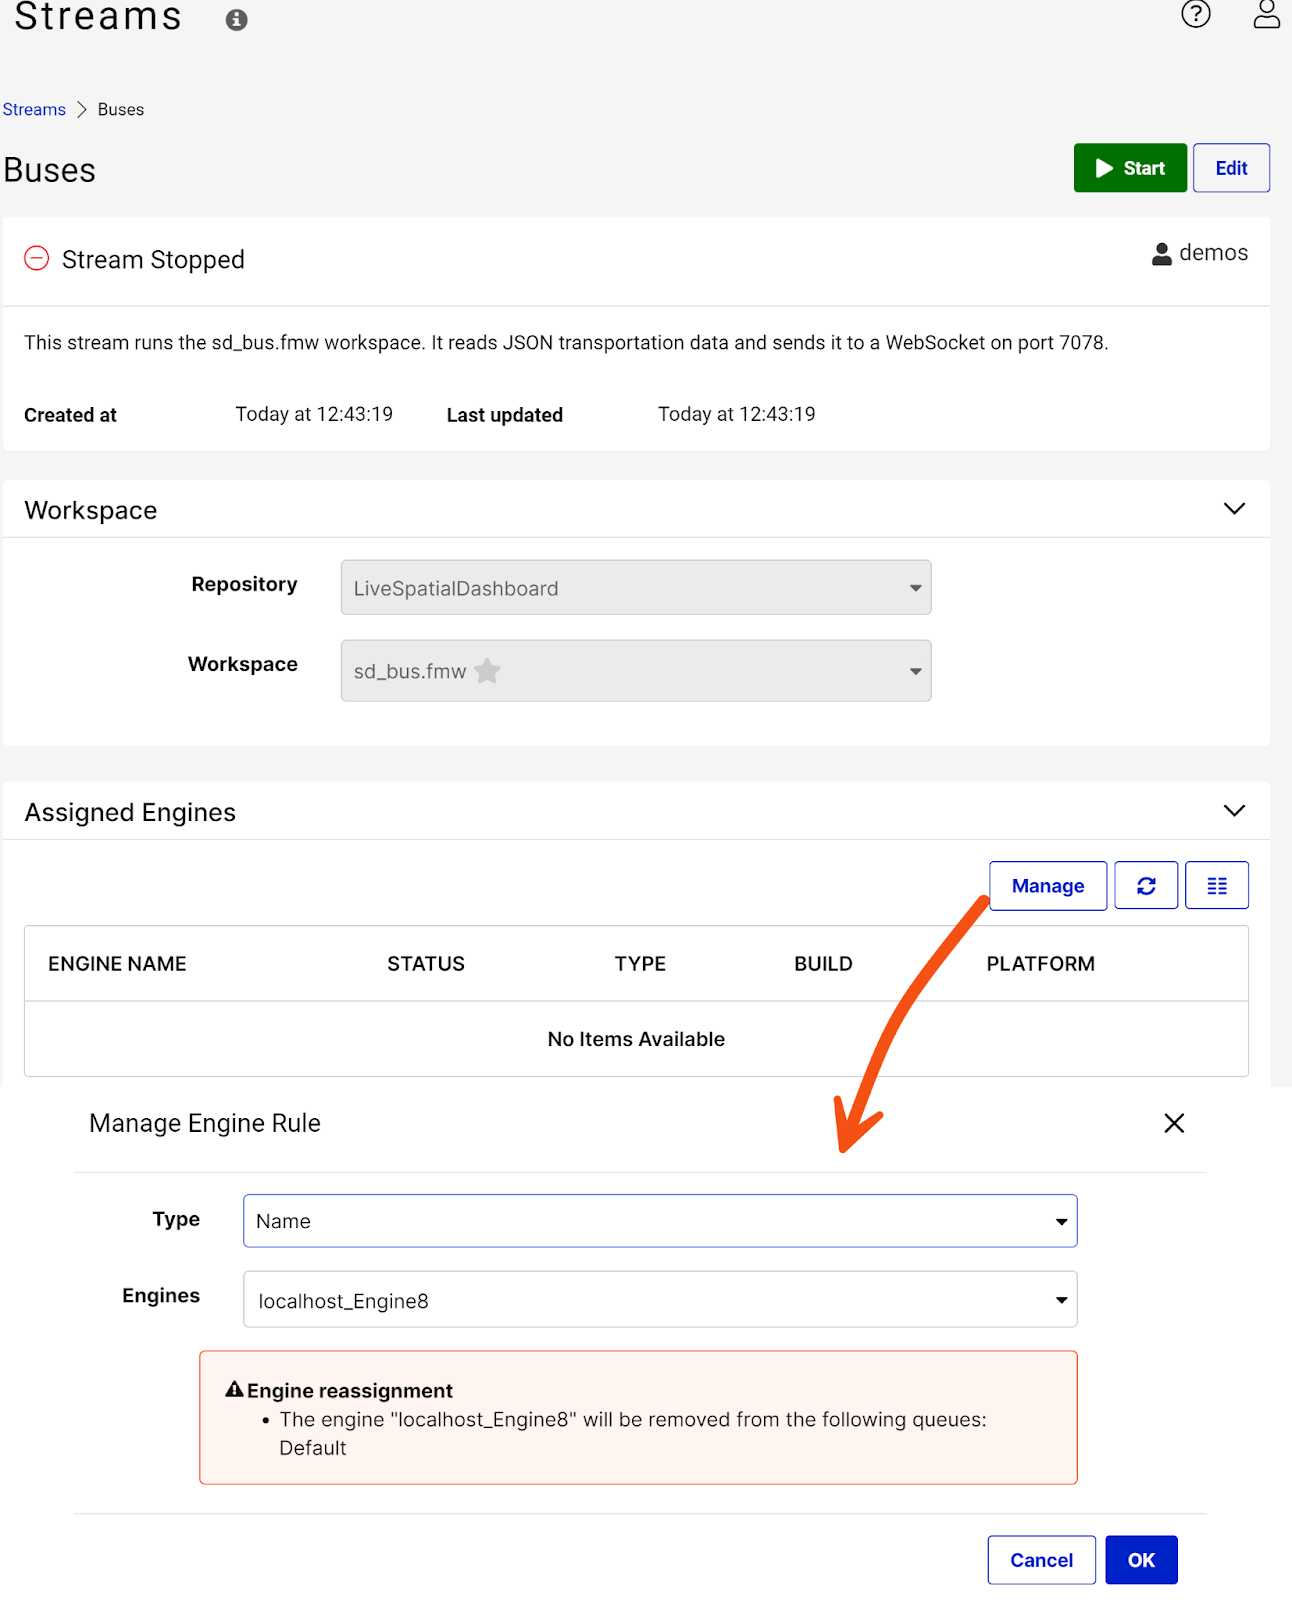
You should see the engine appear under Assigned Engines. At the top of the page click Start to begin the stream. In the Manage Engines tab, under Streams, a green checkmark Status indicates the stream is now running.
Continuous monitoring of streaming services requires dedicated engines. CPU-Usage Engines provide a cost-effective solution to this problem by ensuring resources are only used when processing data, even during low activity periods. To learn more about dynamic engines, check out Getting Started with CPU-Usage (Dynamic) Engines.
3. Verify the WebSocket Data (Optional)
While it's not strictly necessary to inspect the WebSocket stream on FME Flow before integrating it elsewhere, doing so can help ensure your messages are formatted correctly. The easiest way to verify this is by creating an FME Flow Automation to log the messages from the bus stream. Here’s how to do it.
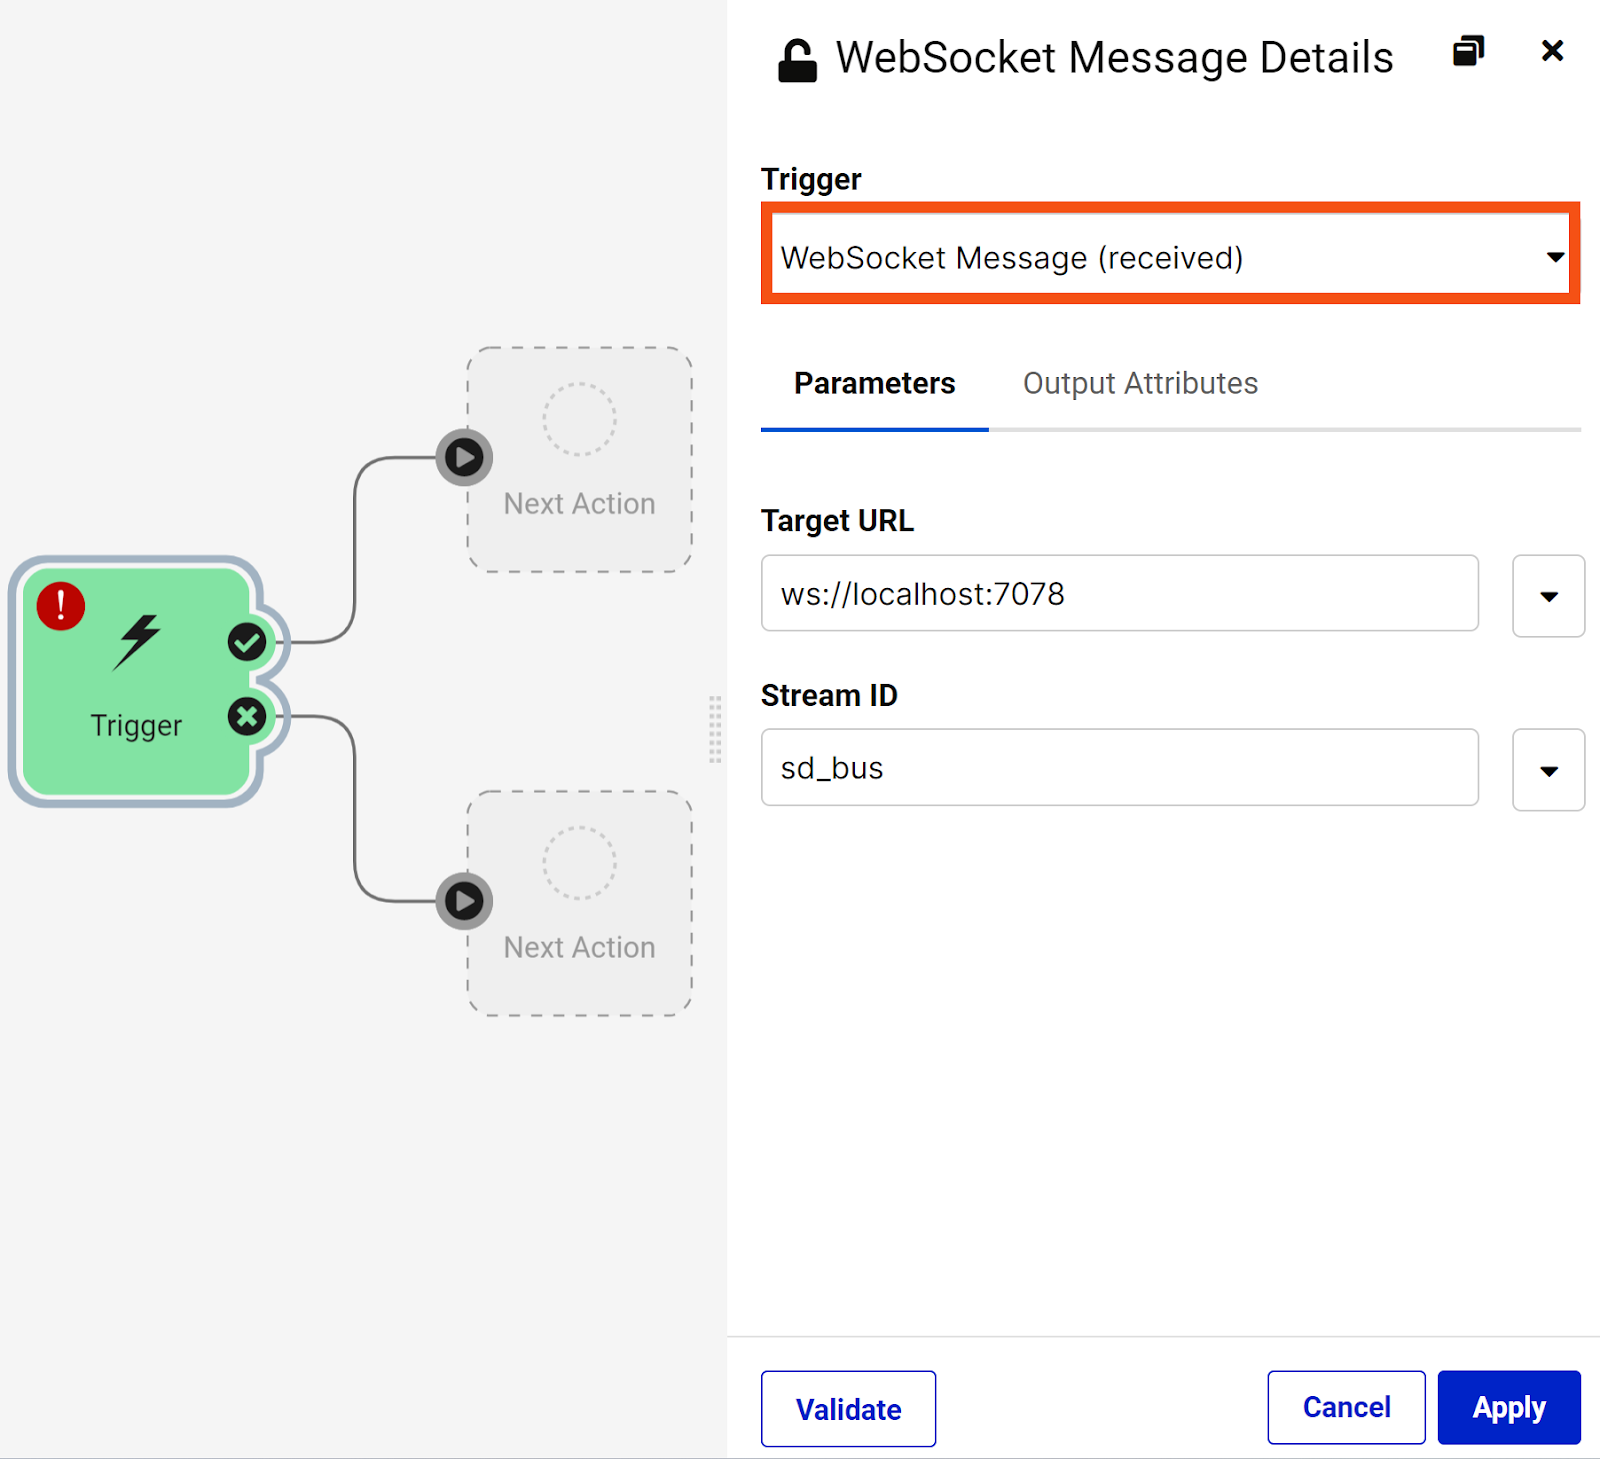
Create a new Automation in FME Flow. Add a WebSocket Message Trigger. In the Trigger Details pane, change the Trigger type to “WebSocket Message (received)” and enter the Target URL, using the same URL specified in your workspace. Next, set the Stream ID to “sd_bus”, which was set in the connection preamble of the WebSocketConnector within your workspace (Part 1, step 3). Click Apply to save your trigger settings.
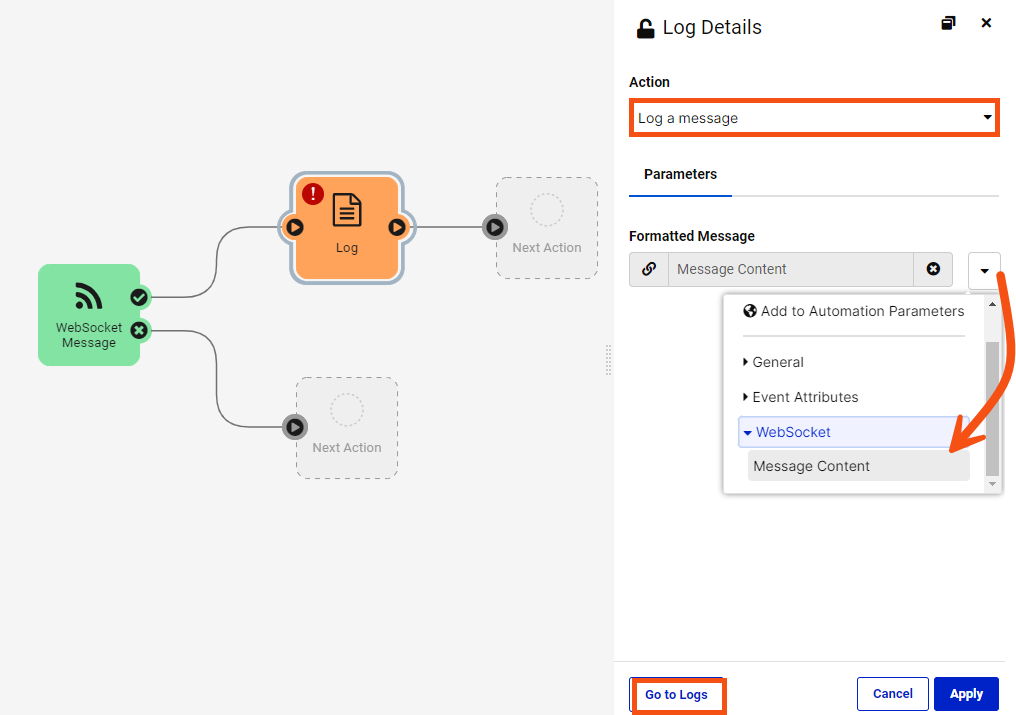
Add a Log a Message Action to the Automation. Under Formatted Message, open the dropdown menu and select WebSocket > Message Content, then press Apply.
Save the automation, give it a name, and press Start to begin the automation.
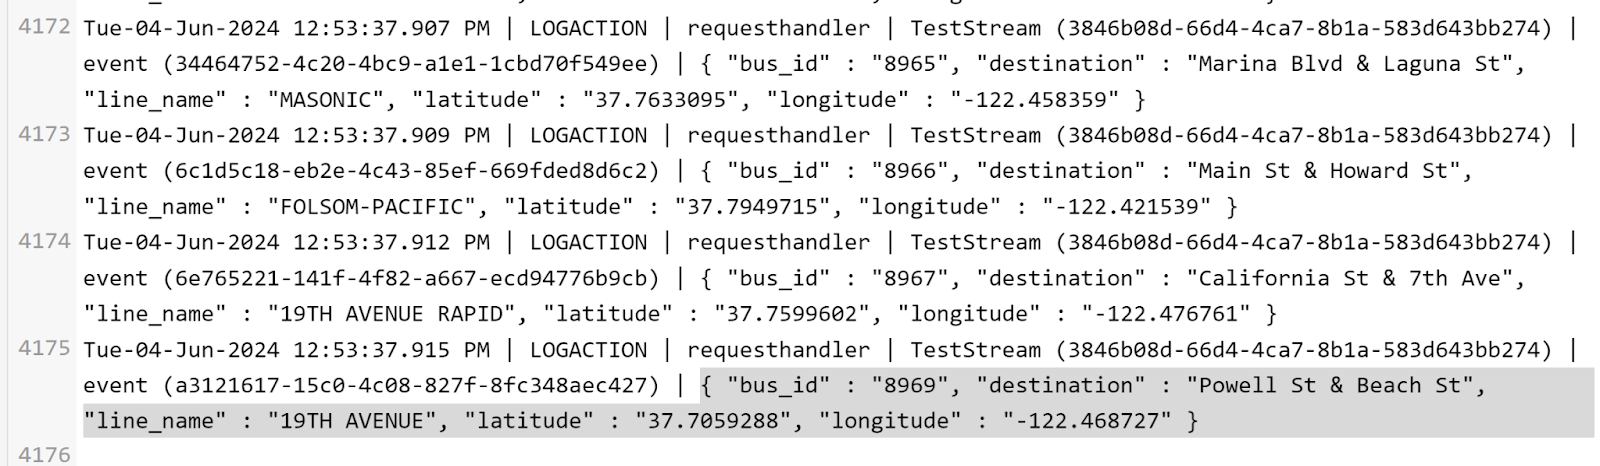
Open the Log action again and select Go to Logs to view the logged messages.
Scroll to the bottom of the log to find the most recent record and confirm that the workspace is streaming and formatting your WebSocket message correctly.
The logger will add system information before the message's contents. Your logs should look similar to this.
Part 3: Receiving an FME Flow WebSocket Stream with JavaScript
This section uses a scripted web application to receive data from the ‘Buses’ Stream in FME Flow. Web applications can use basic JavaScript to receive data from the FME Flow WebSocket Server.
For your reference, a completed example that uses Leaflet to display the live WebSocket data is available in the exercise files attached to this article.
1. Create a basic HTML Page
To view the WebSocket data in the browser console, you’ll need a basic HTML page. You can either use the HTML file provided in the exercise files or create a simple HTML page and add a reference to your JavaScript file.
<!DOCTYPE html>
<html lang="en">
    <head>
        <meta charset="UTF-8">
        <meta name="viewport" content="width=device-width, initial-scale=1.0">
        <title>Document</title>
        <script src="js/main.js" type="text/javascript" defer></script
    </head>
    <body>

    </body>
</html>
2. Add Event Listeners to Your WebSocket Connection
JavaScript enables the browser to receive WebSocket data. Create a JavaScript file or use the script provided in the exercise files (js/main.js).
First, the JavaScript needs to establish a connection to the FME Flow WebSocket Server. Create a constant called “socket” that will hold the FME Flow WebSocket Server URL.
const socket = new WebSocket('ws://localhost:7078/websocket');
Next, an event listener will listen and log the WebSocket connection.
- The console.log method writes a success message to the browser console.
- The openMessage constant holds a JSON message requesting access to the ‘Buses’ WebSocket stream. By placing the stream IDs in an array, you can request multiple streams at once.
- The socket.send method delivers the message to FME Flow. In this example, the message is first parsed into JSON. For more details about WebSocket open events, refer to the Mozilla Development Network documentation.
socket.addEventListener('open', (event) => {
    console.log('Connected to WebSocket server');
    const openMessage = {
        ws_op: "open",
        ws_stream_ids: ["sd_ship", "sd_plane", "sd_bus"]
    };
    socket.send(JSON.stringify(openMessage));
});
After requesting the WebSocket stream, create another event listener to handle the incoming responses. When data is received through a WebSocket, a message event is triggered.
Use the JSON.parse method on the data property to parse the message data into JSON format.
To view the data stream, use the console.log method to write the parsed data into the browser console. See more about message events on the Mozilla Development Network.
socket.addEventListener('message', (event) => {
    const data = JSON.parse(event.data);
    console.log(data)
});
In total, your JavaScript script should look like this:
const socket = new WebSocket('ws://localhost:7078/websocket');
socket.addEventListener('open', (event) => {
    console.log('Connected to WebSocket server');
    const openMessage = {
        ws_op: "open",
        ws_stream_ids: ["sd_ship", "sd_plane", "sd_bus"]
    };
    socket.send(JSON.stringify(openMessage));
});
socket.addEventListener('message', (event) => {
    const data = JSON.parse(event.data);
    console.log(data)
});
3. Open the Browser Console
To view your WebSocket data, open your HTML document in a browser. Open the browser Developer Tools. You should see your WebSocket data streaming in the browser console.
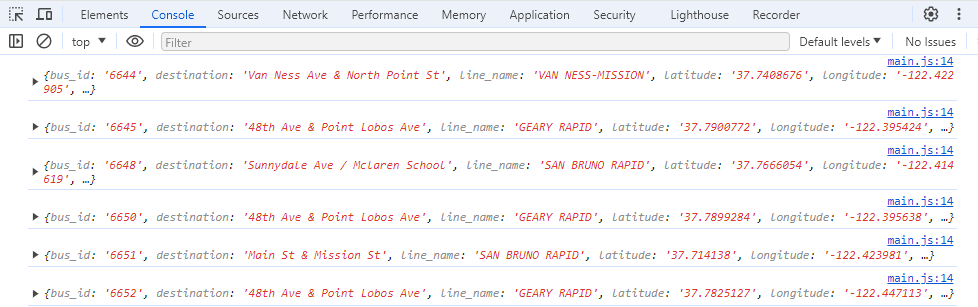
In less than 20 lines of code, we've successfully connected our browser to an FME Flow WebSocket server!
To extend this functionality, explore the exercise files to learn how to display the data on a web map.