Files
Introduction
This article is part 4 of a 5-part series to help you get started with basic Python and FME. This article discusses the use of the PythonCaller transformer within Workbench, providing three examples of its applications in different scenarios, including functions and classes.
The PythonCaller transformer enables you to perform operations on features or groups of features using a Python script. Before using this transformer, please verify that there is no existing FME transformer that performs the task you wish to accomplish. Browse the List of Transformers or ask the FME Community to see if there is a transformer that can help you.
The PythonCaller can call a function that you can use to process one feature at a time, or a class where you may want to do things to groups of features. The PythonCaller can use the full range of FME Objects, including numerous methods and classes.
The PythonCaller can interface with a Python script via a class.
- Use the Class interface for more flexibility, including group-by functionality
- Use the Function interface when you intend to process a single feature at a time (in versions older than 2021.0)
The Function interface has been removed from the PythonCaller template in 2021.0. However, existing Python functions will continue to run in FME 2021+. Users wishing to migrate to the Class interface should move their Python script to the input method of the Python class in the template. See example 2 for a demo of migrating an existing PythonCaller to use the Class interface.
FME Objects and Python
Much of FME's core functionality is available within Python scripts through the use of FME classes and methods from the FME Objects Python API. For more information on the FME Objects Python API, please see the introductory Tutorial: Python and FME Basics article.
Examples
Example 1: Python Function to Add an Attribute to a Feature
Attached workspace: PythonCaller1.fmw in pythoncaller-workspaces-2021.zip
In this example, we will use a simple Python script to add a timestamp to features. This is not an ideal use for the PythonCaller, as this task could be accomplished with the standard DateTimeStamper transformer. However, it is a simple but effective example that demonstrates how to use the transformer.
You can follow the exercise by creating your own workspace using the example, or you can view the final workspace (PythonCaller1.fmw), which is located in the Files section on the right.
Add a PythonCaller transformer to your workspace and double-click to open the parameters dialog. You should see the Script Editor pane located in the middle of the dialog window.
Notice that there is already a template class in place. The __init__, input, and close methods in the template Python class are required and must be present in the script. The group_by method is optional, depending on whether group-by mode is used for the transformer.
Copy the code below if you are building the workspace. You may need to add some line returns and indentation to the code so that it looks like this (remember, indents matter in Python):
import fmeobjects
import time

class timestampFeature(object):
    """Template Class Interface:
    When using this class, make sure its name is set as the value of the 'Class
    to Process Features' transformer parameter.
    """

    def __init__(self):
            """Base constructor for class members."""
            pass

    def input(self, feature):
            """This method is called for each FME Feature entering the
            PythonCaller.
            """
            curTime = time.ctime(time.time())
            feature.setAttribute("timestamp", curTime)
            self.pyoutput(feature)

    def close(self):
            """This method is called once all the FME Features have been processed
            from input().
            """
            pass
The input method is called for each feature that enters the PythonCaller and is suitable for features that require processing one by one within the function.
A new attribute is added to the feature with the setAttribute() method on the feature - this is actually an FME Objects method. In the same pane, set the Class to Process Feature parameter to the name of the function: timestampFeature. Because we have added a new attribute called timestamp, we can expose it by entering its name in the Attributes to Expose parameter. To expose the new attribute, double-click on the field or click on the ellipsis, and type in the new attribute name in the Enter Values for Attributes to Expose window.
Use a Creator transformer to create some features to send to the PythonCaller, add a Decelerator (set to a 0-second delay per feature), and a Logger to view the output. Run the workspace and review the Translation Log pane after the translation has completed. You may need to scroll up to see the features logged. Every feature should have a timestamp attribute.
If you are using FME 2025.2 and newer, please note that the PythonCaller no longer requires a creator to initiate.
As of FME 2025.2, many transformers have been updated to not require input from the creator transformer. For a list of all the transformers with this improvement, please see Transformers with an Optional Input Port
View the attribute added to each feature with the PythonCaller function within the Translation Log pane.
Change the per-second delay in the Decelerator before the PythonCaller to 2 2-second delay per feature, and you will see a change in each feature’s timestamp attribute. This is because of the time.The ctime() method is called once when each feature enters the PythonCaller, as it is defined in the input method of the PythonCaller class.
Example 2: Migrating from the PythonCaller function interface to class interface for the FuzzyStringComparer custom transformer
Attached workspaces: PythonCaller2_begin.fmwt, PythonCaller2_complete.fmwt)
The FME Hub includes a custom transformer called the FuzzyStringComparer, which uses the Python difflib module to compare two string attributes and calculate a similarity ratio. In some ways, this is a better example because it is something that cannot be done with a regular FME transformer.
The original transformer was built when the PythonCaller had a Function interface and a Class interface. As the Function interface has been deprecated starting in FME 2021.0, this example will also demonstrate how to migrate Python scripts that use the Function interface in PythonCallers of existing workspaces to the Class interface. Follow the instructions using the starting workspace (PythonCaller2_begin.fmwt) or view the migrated end workspace (PythonCaller2_complete.fmwt). Both can be found in the Files section above.
Open the starting workspace (PythonCaller2_begin.fmwt). Open the FuzzyStringComparer and note the parameters. The FuzzyStringComparer compares two strings (CommonName and CommonName2) and stores a similarity ratio in an attribute called ratioCompare. The AttributeManager is used to create the similarity ratio attribute beforehand.
Select the transformer, right-click on it, and then select 'Edit' to view its contents. A new canvas pane tab will open. Locate the PythonCaller transformer and go to its properties to access the script editor.
For the purpose of this example, we will only focus on sections of directly relevant code. Notice we are using a function interface--to compare string attributes on a feature-by-feature basis. We get the two string attributes with feature.getAttribute() and define them as string1 and string2, respectively. The strings are compared with the difflib.SequenceMatcher class and a SequenceMatcher object is created. By calling the SequenceMatcher object's ratio() method, a ratio measuring the two strings’ similarity is returned. Again, we are creating a new attribute called FuzzyStringCompare.ratio, which is assigned the ratio value.
import difflib
import sys

def FuzzyStringCompare(feature):
# get strings from attributes
	string1 = feature.getAttribute('FuzzyStringCompare.string1')
	string2 = feature.getAttribute('FuzzyStringCompare.string2')
	version = sys.version_info[0]

	if string1 != None and string2 != None:
   		# convert to unicode strings if necessary
   		if version > 2:
    			if not isinstance(string1, str):
   				string1 = '{}'.format(string1)
   			if not isinstance(string2, str):
   				string2 = '{}'.format(string2)
			else:
   				if not isinstance(string1, unicode):
					string1 = u'{}'.format(string1)
				if not isinstance(string2, unicode):
					string2 = u'{}'.format(string2)
		# calculate difference ratio
		s = difflib.SequenceMatcher(None,string1.lower(),string2.lower())
		ratio = s.ratio()

   		# update input strings
		differ = difflib.ndiff(string1,string2)
		diff1 = ''
		diff2 = ''
		for line in differ:
			if line[0] == '-':
				diff1 = diff1 + (line[2])
				diff2 = diff2 + ' '
			elif line[0] == '+':
				diff1 = diff1 + ' '
				diff2 = diff2 + (line[2])
			else:
				diff1 = diff1 + (line[2])
				diff2 = diff2 + (line[2])

		# set new attributes on feature
		feature.setAttribute('FuzzyStringCompare.ratio',ratio)
		feature.setAttribute('FuzzyStringCompare.string1',diff1)
		feature.setAttribute('FuzzyStringCompare.string2',diff2)
The PythonCaller parameters dialogue box tells the PythonCaller transformer which class to call and which attribute to expose. As this is a custom transformer, the field will already be pre-populated with 'FuzzyStringCompare' (name of function) and the attribute 'FuzzyStringCompare.ratio' (attribute name containing the similarity ratio). An AttributeCreator is used later in the custom transformer workflow to access the attribute we have created and exposed.
The fuzzy string compare logic is a Python script wrapped as a Python function. The function is specified in the Class to Process Features parameter and the output attribute is exposed in the Attributes To Expose parameter.
Run the workspace and view the output. You will see a new attribute with values ranging from 0 to 1.0 which represents the similarity ratio between the two string attributes you have specified.
If the Python code in the FuzzyStringComparer custom transformer is different than the one above, you most likely have downloaded a different version of the custom transformer. This article uses version 6 of the transformer. However, the principle should remain more or less the same.
To migrate the script in the PythonCaller from the Function interface to the Class interface, you will have to evaluate what parts of the script does and place parts into the appropriate method.
For example, parts of Python scripts that need to be run once for each feature (eg. get attribute value from features) should be placed in the input method as this method is called once for each feature entering the PythonCaller. Parts of a script that only need to be run once and are not dependent on input features can be placed in the __init__ method while parts that only need to be run once but after all features are received should be placed in the close method.
Copy the entire script and add the Class interface to the PythonCaller by selecting Presets > Load FME Defaults.
Add the Class interface to the PythonCaller by using the Preset’s functionality Load FME Defaults option.
Paste the previous script to the top of the script editor pane. Move lines 4 to 45 into the input method, add an additional indent to the pasted lines plus the self.pyoutput(feature) line. Delete the following line:
def FuzzyStringCompare(feature):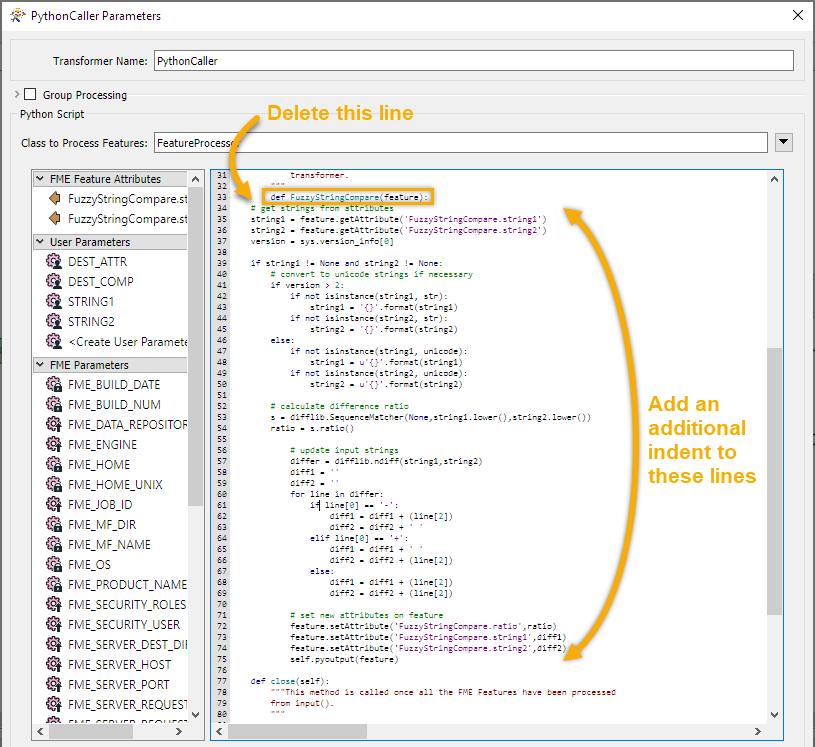
Steps to take after pasting the copied lines to the input method. Add an additional indent to the lines 33 to 75 and delete line 33 (def FuzzyStringCompare(feature):)
Note the self.pyoutput(feature) is required for features to continue through the workspace; they must be written out using the pyoutput() method.
Because the value of sys.version_info[0] does not change depending on the feature, it can be moved out of the input method and into the __init__ method. Copy this line into the __init__ method, allowing it to replace the pass in the template. If run as is, the PythonCaller will fail with a nameError--the version variable needs to be prefixed with self (eg. self.version=sys.version_info[0]). Once you have changed this, the variable name in the input method will also needs to be changed (eg. line 41 in screenshot above). You can also remove the group_by method in the Python script since it is not used in this standard mode scenario (ie. no group by specified).
The script should now look like this:
import difflib
import sys

import fme
import fmeobjects


class FeatureProcessor(object):
    """Template Class Interface:
    When using this class, make sure its name is set as the value of the 'Class
    to Process Features' transformer parameter.
    """

    def __init__(self):
        """Base constructor for class members."""
            self.version = sys.version_info[0]

    def input(self, feature):
        """This method is called for each FME Feature entering the
        PythonCaller. If knowledge of all input Features is not required for
        processing, then the processed Feature can be emitted from this method
        through self.pyoutput(). Otherwise, the input FME Feature should be
        cached to a list class member and processed in process_group() when
        'Group by' attributes(s) are specified, or the close() method.

        :param fmeobjects.FMEFeature feature: FME Feature entering the
            transformer.
        """
        # get strings from attributes
        string1 = feature.getAttribute('FuzzyStringCompare.string1')
        string2 = feature.getAttribute('FuzzyStringCompare.string2')

        if string1 != None and string2 != None:
            # convert to unicode strings if necessary
            if self.version > 2:
                if not isinstance(string1, str):
                    string1 = '{}'.format(string1)
                if not isinstance(string2, str):
                    string2 = '{}'.format(string2)
            else:
                if not isinstance(string1, unicode):
                    string1 = u'{}'.format(string1)
                if not isinstance(string2, unicode):
                    string2 = u'{}'.format(string2)

            # calculate difference ratio
            s = difflib.SequenceMatcher(None,string1.lower(),string2.lower())
            ratio = s.ratio()

                # update input strings
                differ = difflib.ndiff(string1,string2)
                diff1 = ''
                diff2 = ''
                for line in differ:
                    if line[0] == '-':
                        diff1 = diff1 + (line[2])
                        diff2 = diff2 + ' '
                    elif line[0] == '+':
                        diff1 = diff1 + ' '
                        diff2 = diff2 + (line[2])
                    else:
                        diff1 = diff1 + (line[2])
                        diff2 = diff2 + (line[2])

                # set new attributes on feature
                feature.setAttribute('FuzzyStringCompare.ratio',ratio)
                feature.setAttribute('FuzzyStringCompare.string1',diff1)
                feature.setAttribute('FuzzyStringCompare.string2',diff2)
                self.pyoutput(feature)

    def close(self):
        """This method is called once all the FME Features have been processed
        from input().
        """
            pass
Remember to set the Attributes to Expose parameter to the FuzzyStringCompare.ratio attribute again.
Example 3: Python class with Group By mode to process groups of features
Attached workspace: PythonCaller3.fmwt
The Group By functionality was added to FME in version 2021.0. This example demonstrates how to use the PythonCaller transformer in Group By mode with a Python class to perform processing that calculates the sum of an attribute value for a group of features and outputs one feature for each group. This task can be easily accomplished with a transformer in FME. However, we demonstrate how this can be accomplished with Python to illustrate the process.
Group by functionality was added to the PythonCaller transformer in FME 2021.0
For the completed workspace, please use the PythonCaller3.fmwt from the Files section above.
Open the workspace and open the PythonCaller transformer. Note that Group Processing is enabled on the attribute ‘Neighbourhood’. The transformer contains the following script within the script editor.
import fme
import fmeobjects

class FeatureProcessor(object):
    def __init__(self):
        self.feature_list = []
        self.total_diameter = 0.0

    def input(self, feature):
        self.feature_list.append(feature)
        self.total_diameter += feature.getAttribute('Diameter')

    def close(self):
        pass

    def process_group(self):
        for feature in self.feature_list:
            feature.setAttribute("group_total_diameter", self.total_diameter)
        self.pyoutput(feature)
        self.feature_list = []
        self.total_diameter = 0.0
In the __init__ method, two class member variables are created: for a list and float. In the input method, each input feature is cached to the class member variable list and the diameter attribute from each feature is added to the self.total_diameter class member variable.
The process_group method is called once all members of a group has been sent to the input method. As the desired output is the sum of the diameter value for each neighbourhood group, the setAttribute method is called in the process_group method. It is important to note that if we want features to continue through the workspace they must be written out using the pyoutput() method. Note that all class member variables (eg. self.feature_list and self.total_diameter) should be reset for the next group of features.
In this example, the pyoutput() method is outside of the for loop and so one feature will continue for each group. Run the workspace and six features will be output from the PythonCaller.
Six features output from PythonCaller when pyoutput() method is outside of the for loop as it is called once per group.
FME 2024.2 added support for the get_group_fields() method, which allows a user to programmatically identify the Group By attribute name(s) set in the PythonCaller. This method enables the identification of the group being processed without requiring the Group By attribute name(s) to be hard-coded in the script. A benefit of not hard-coding the attribute name is less modifications to the script is required if 'Group By' parameter in the PythonCaller is changed to another attribute.
The following script is an example of using the get_group_fields method to identify the Neighbourhood group being processed in the process_group method and output the group name to the log window.
import fme
import fmeobjects

class FeatureProcessor(object):
    def __init__(self):
        self.feature_list = []
        self.total_diameter = 0.0

    def input(self, feature):
        self.feature_list.append(feature)
        self.total_diameter += feature.getAttribute('Diameter')

    def close(self):
        pass

    def process_group(self):
        group_fields = self.get_group_fields()
        for feature in self.feature_list:
            feature.setAttribute("group_total_diameter", self.total_diameter)
        self.pyoutput(feature)
        print(f"Processed {feature.getAttribute(group_fields[0])} group")
        self.feature_list = []
        self.total_diameter = 0.0
If the pyoutput() method is within the for loop, then all input features will continue. Try indenting the line containing the pyoutput() method so it is within the for loop and running the workspace again. 28259 features will continue to the logger (same as number of input features).
28259 features output from PythonCaller when pyoutput() method is inside of the for loop as it is called for each feature of each group.
Example 4: Python class to automate defining a custom KML Folder hierarchy
Attached workspace: PythonCaller4.fmwt
The Creating KML Folders Through KML ID of the KML Transformations tutorial outlinesoutlines one method creating KML Folders, which define the nested tree structure in the Google Earth Places pane. It uses KML IDs to define a custom hierarchy with direct control over folder naming, parent-child relationships, and folder levels.
Manually define a custom folder hierarchy with AttributeCreators for each folder within each folder level
However, using a Creator to create a null geometry record for each folder and using an AttributeCreator or AttributeManager to set the kml_id, kml_parent, kml_document attributes for each folder can be time-consuming and labor-intensive. With some transformers to prepare the data and a Python class, you can automate and make this process more data-driven.
For the completed workspace, please use PythonCaller4.fmwt from the Files section above.
Start a new blank workspace and add your reader to the canvas. There are two streams for the input features: one that writes features containing geometry, and the second that defines and creates the KML folders. In this example, we will focus on the second stream.
Add a GeometryRemover and an AttributeManager. The key to this process is to find every folder that needs to be created for each level. To find every possible combination of the 1st level and 2nd level folders, create a concatenated string of 2nd level folder attributes and 1st level folder attributes (Crime Type and Neighbourhood in the example workspace) with a delimiter between the two attribute values in the AttributeManager.
Create a concatenated string value of the 2nd level and 1st level folder attributes with a delimiter between the two values.
Add the UniqueValueLogger custom transformer and set the Attribute to Analyze parameter to the concatenated string value created in the AttributeManager. This is used to find the all unique combinations of the 2nd and 1st level attributes (Crime Types and Neighbourhood values). Add a PythonCaller and add the following script:
import fme
import fmeobjects

# Template Class Interface:
# When using this class, make sure its name is set as the value of
# the 'Class or Function to Process Features' transformer parameter
class FeatureProcessor(object):
    def __init__(self):
        self.featureList = []
    def input(self,feature):
        self.featureList.append(feature)
    def close(self):
        for feature in self.featureList:
            listAttr = feature.getAttribute('_value')
            feature.setAttribute("kml_id", listAttr)
            feature.setAttribute("kml_name", listAttr.rpartition(';;')[0])
            feature.setAttribute("kml_parent", listAttr.rpartition(';;')[-1])
            self.pyoutput(feature)
The script imports the fmeobjects module as it uses FME Object methods. A class member list variable is initialized in the __init__ function and features are cached to this list in the input function using the append method.
In the close function, we iterate through the list of features and get the concatenated string value of (Crime Types and Neighbourhood in the example workspace) for each feature (‘_value’) using the getAttribute() method.
To determine the name of the folder to be created, we use the kml_name attribute. Using the rpartition method on the concatenated string value, we split the feature at the separator/delimiter (‘;;’ in example) and set the first element, denoted as listAttr.rpartition(';;')[0], as the value of kml_name (Crime Types, in example workspace). Note: whether you use the first or last element will depend on how the concatenated string is structured. Ensure you are using the correct values by inspecting the output features.
Similarly, to determine the parent folder, we use the kml_parent attribute. Instead of using the first element of rpartition, we use the last element [-1]. In addition, as each folder feature must have unique ID values, we set the concatenated 1st and 2nd level string value as kml_id.
As we require a folder to be created for each feature, we need to use self.pyoutput(feature) to ensure the null folder features continue through the workspace. Remember to expose attributes required for the KML writer such as kml_id, kml_name, and kml_parent within the PythonCaller.
The first level folders are relatively simpler as it only requires each unique value of the first level attributes. In the example, this is the Neighbourhood value. Again, we use the UniqueValueLogger to find unique 1st level folder attributes. Using a similar Python script as above, we can set the unique attribute value as both the kml_id and kml_name. It is not necessary to set kml_parent for first level folders.
Add a KML writer for the feature type ‘Folders’ and connect the outputs of the PythonCallers to this writer. This feature type writer will then create a custom folder hierarchy for your features.
Second stream in workspace which defines the custom folder hierarchy using the data’s attributes.
To associate your features (with geometry) with the appropriate parent folder, create a kml_parent attribute for your features and set the value as the kml_id of the folder you want your features to be located within using an AttributeManager. In the example workspace, it would be the concatenated string of 2nd level folder attribute and 1st level folder attribute value (@Value(Type);;@Value(Neighbourhood) in the completed workspace). Add another KML feature type writer and connect the outputs of the AttributeManager.
Workflow to associate features with appropriate parent folder using kml_parent attribute.
Run the workspace and open the resulting KML file within Google Earth. A custom folder hierarchy has been created and your features are associated with a parent folder, allowing for data organization and ease of viewing.
View of data within Google Earth with a Custom KML folder hierarchy created by a data-driven process using the UniqueValueLogger custom transformer and a Python script.
Documentation
Python-related transformers have excellent Help available right in FME Workbench which can be accessed at Help > FME Transformers, or directly by right-clicking the transformer within the Workbench canvas and selecting Help (at the bottom of the menu).
You can find the complete documentation of the Python FME Objects API here: FME Objects Python API
Data Attribution
The data used here originates from open data made available by the City of Vancouver, British Columbia. It contains information licensed under the Open Government License - Vancouver.