Introduction
With the combination of the Databricks format and SQL statements, users can take advantage of the Data Lakehouse's processing power to bring their data to life with FME. The Databricks format also provides the opportunity to work with SQL statements unique to Delta Lakes, such as time traveling with Delta Lake table history.
This article provides examples of some of the different ways SQL statements can be used to enhance performance and advance workflows.
Reading Delta Table History
Each operation that modifies a Delta Lake table creates a new table version, making it handy for reading past versions before certain changes. Using SQL queries unique to Databricks Delta tables, FME can read different table versions using the SQLCreator or SQLExecutor transformers. Databricks refers to this functionality as time travel.
For more information, see the Databricks documentation.
Retrieving the Table Version
Using the DESCRIBE HISTORY SQL statement, an overview of the table history can be retrieved. This includes information such as the operations, user, and timestamp for each change to a Delta table. By default, table history retention is 30 days, but it can be adjusted in Databricks.
In FME, an SQLCreator or SQLExecutor transformer can be used to perform the DESCRIBE HISTORY statement to discover what versions exist for a Databricks Delta table. We can also add Attributes to Expose using the Populate from SQL Query function. This will return information such as the version, timestamp, userId of who performed the change, clusterId, and more.
If you are unsure which table you want to read, you can expand the Database Tables drop-down menu on the left side of the window and double-click the table you want to add to the SQL query builder.
Running the SQLCreator will output the delta table versions. Below is an example of the output
AI Assist
New to FME 2023.1, the AI Assist functionality is available in the SQL Statement Editor to help new and experienced users build out SQL Statements. Schema information from your database can also be sent to the AI service to return a result containing the correct table and column names.
How to use the AI Assist with SQL
In FME 2023.1 and greater, you can access the AI Assist through the SQL Statement Editor. It will appear as a button in the bottom left corner of the window.
Using the sample screenshot below, we will provide an overview of each component of the AI Assist window.
1. SQL Query Description
This is where you can specify your request in plain English. For example:
"Get all records where neighborhood is fairview from the publicart table"
This would return a SQL statement such as:
SELECT * FROM "public"."publicart" WHERE "neighborhood" = 'Fairview'
Send the database schema to AI
When enabled, FME scans your database schema to provide a more accurate result from the AI Assist. The resulting SQL is tailored to the tables and columns in your database instead of providing generic naming.
Tip: The Send database schema to AI parameter can prolong the time it takes to return an SQL query from the AI Assist. This is because FME must parse through all the database tables and column names and send them to the AI. The number of tables and columns in each table will dictate how long it takes FME to scan your database schema.
2. Status
Provides an overview of the status of the AI request and whether it succeeded or not.
3. AI Results
These are the results from the description after it has been run through the AI data model. This will include a functional SQL query to use in the SQL editor. If Send database schema to AI is enabled, then the query may include accurate table and column names.
4. Explanation
To help users understand the AI results, each object within the SQL query is broken down with an explanation.
Disclaimers
For legal information regarding the AI Assist, please see our AI Terms of Use.
If you have any feedback regarding the use of AI Assist in the SQL Editor, please comment on this article or contact us at info@safe.com.
Reading a Table Version with a Version Number
The version number retrieved in the SQLCreator can be used to query a specific Delta table version. Now that the table versions are known to the user, you can query a specific Delta table version. Using the VERSION AS OF version_number statement, users can query a specific version number.
In the SQLCreator, the version number to read is specified after a SELECT statement. For example, if we want to read version 10 of the table, we use the following query:
SELECT * FROM ‘default’.’publicart’
VERSION AS OF 10
Reading different versions of the same table returns different results. In our example, Version 19 returns 2,180,00 features, whereas Version 10 only returns 663,000 features. Using Delta table functionality, we can get completely different results from the same table stored in Databricks.
Reading a Table Version with a Timestamp
Databricks Delta table versions can also be read using a specific time stamp. This could be a datetime string (2023-03-10T12:42:00), or just a date string (2023-03-10).
The timestamp_expression can be any one of the following:
- '2018-10-18T22:15:12.013Z', that is, a string that can be cast to a timestamp
- cast('2018-10-18 13:36:32 CEST' as timestamp)
- '2018-10-18', that is, a date string
- current_timestamp() - interval 12 hours
- date_sub(current_date(), 1)
- Any other expression that is or can be cast to a timestamp
Again, using the SQLCreator/SQLExecutor, we can query our features using a SELECT statement, followed by the version we want to read according to a timestamp. For example, if we wanted to read what the table looked like as of 2023-04-03, we can use the following SQL:
SELECT * FROM ‘default’.’publicart’
TIMESTAMP AS OF ‘2023-04-03’
In the example above, we read the table with the timestamp of 2023-04-03 and received 670 features back.
Performing a WHERE Clause
Reading in only the data (attributes and features) you need for your workflow can significantly improve overall performance. By restricting the features read in from Databricks with a view, WHERE clause, or SELECT statement, you can streamline the data flow within your workspace, thus improving its speed.
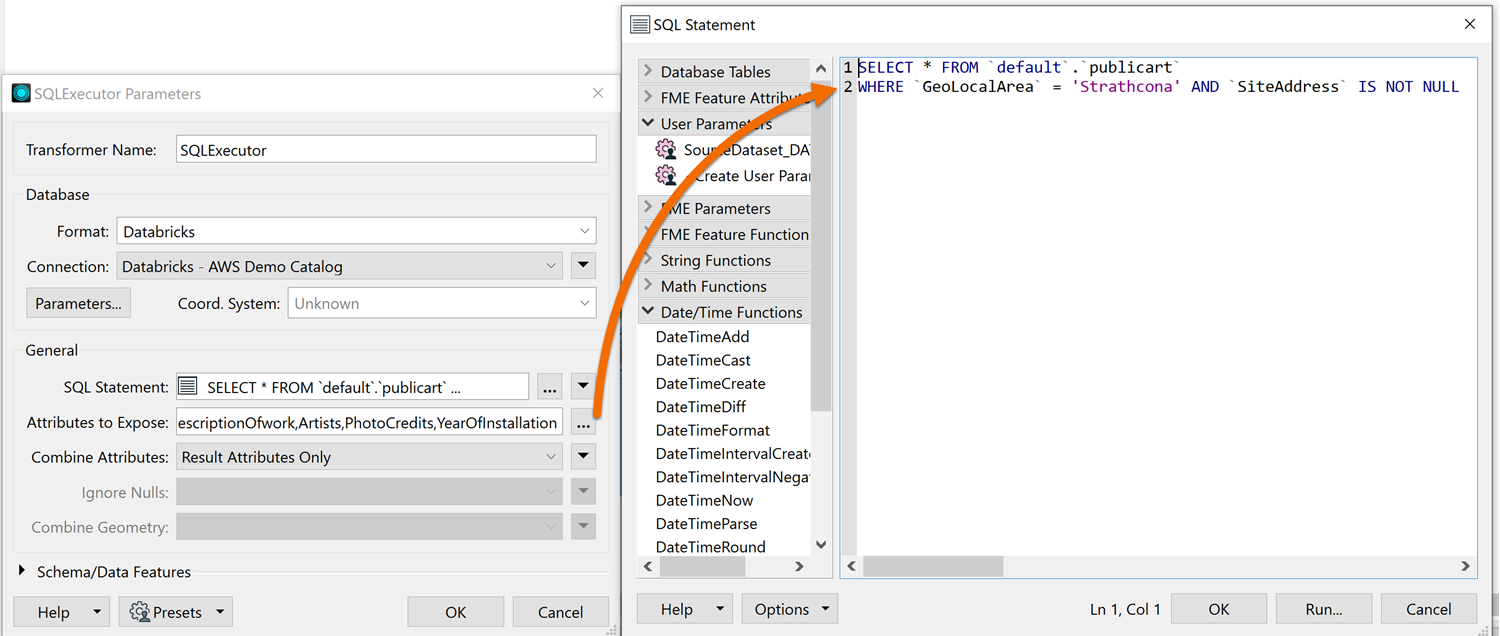
To do so, we can use the SQLCreator or SQLExecutor to specify a WHERE Clause before reading in our data. The Databricks reader also allows for the use of a WHERE Clause on the reader feature type. However, the SQLCreator/SQLExecutor allow for more control over your query, so if you’re familiar with SQL this is the preferred method.
The SQL Statement looks like the others we’ve used so far, starting with a SELECT statement. Afterwards, we can specify the WHERE clause, which dictates how we filter the data before reading it in.
In this case, we want to filter our public art dataset by the Strathcona Neighborhood
For this example, we used the following:
SELECT * FROM ‘default’.’publicart’
WHERE GeoLocalArea = ‘Strathcona’ AND SiteAddress IS NOT NULL
Performance Comparison
Before setting the WHERE clause, 3,153,000 features are read, taking 1 minute 55.3 seconds.
After setting the WHERE clause, only 204,000 features are read, taking just 13.9 seconds. That’s a 88% increase in performance and processing time using just a simple WHERE Clause.
Performing a Join
In this example, the SQLCreator transformer is used to join & read records from two Databricks tables. The SQLCreator allows users to perform complex SQL queries against their data in Databricks, which is then read into FME as features. The queries are executed as they would be in a Databricks notebook, making the full power of the Databricks environment available to the user.
We have a table of address points in a Databricks table and another Databricks table called postal_addresses. Both datasets contain a common identifier field called AddressID. Since the address points dataset contains limited information, we want to join the two tables before reading them into FME. By joining the two, we can enrich the information before integrating it with other systems.
The SQL query is already prepared in our Databricks notebook. Any queries written in Databricks notebooks can be copied and pasted directly into the SQLCreator SQL Statement builder. This makes it easy to take scripts already created in Databricks and use them in FME.
In the SQLCreator, we took the SQL query from our Databricks notebook and pasted it directly in the SQL Statement builder.
Once set, the parameters look as follows:
With this SQL query, we join our features using the ‘AddressId’ field in both tables. A WHERE clause also narrows down our results to just the features where the PostalCode begins with ‘V6J’. By performing the join using the Databricks environment, we can leverage the database's speed alongside FME's integration capabilities.
Additional Resources
The examples provided above only touch on a few of the many uses for SQL with FME. For more ideas on how to take advantage of SQL with Databricks, take a look at these articles for inspiration and ideas on how to use SQL statements in FME.